Making a simple balloon using Inkscape
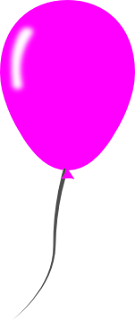
Here is a simple example of making a simple vector line art of a balloon (shown below) using the Inkscape paths and node tools.
Create the balloon body

Create the balloon body
- Create a new Inkscape document. Click the Create Circles, Ellipses and Arcs (F5) button of the Toolbox. Place an ellipse on the canvas. If you like, toggle off the stroke and color fill it with solid pink.

- Select Path | Convert Object to Path. Then click the Edit Paths by Nodes (F2) button in the Toolbox. Drag a rectangle to enclose the middle node as shown below.

- Press ARROW UP on the keyboard a few times.

- Drag a rectangle to cover the middle and bottom nodes as shown below. Then press the Insert New Nodes into Selected Segments button on the Controls Bar.

2 nodes are created.

- Drag a rectangle covering only the two newly created nodes. Then press > on the keyboard a few times to shape the balloon to your satisfaction.


Create the balloon end
- In the Toolbox, click the Create Rectangles and Squares (F4) button. Place a small rectangle on the canvas.

- Select Path | Object to Path. Then click the Edit Paths by Nodes (F2) button in the Toolbox. Drag a rectangle to enclose the top nodes as shown below.

- On the Controls Bar, click the Join Selected Nodes button.

- Drag the triangle segments to reshape the balloon end.

- Press F1. Move the balloon end to the bottom of the balloon body. It might be nice to select both the body and the end parts and align them based on Center on Vertical Axis.


Create the highlight.
- On the Toolbox, click the Create Rectangles and Squares (F4) button. Place a rectangle on the canvas. Then press down CTRL and move the circular handle to round the rectangle as shown.


- Select Path | Object to Path. On the Toolbox, click the Edit Paths by Nodes (F2) button. Drag the long segments to reshape the highlight as shown.


- Change the fill color to white. Move the highlight on the balloon body.

Create the string
- On the Toolbox, click the Draw Bezier Curves and Straight Lines (SHIFT+F6) button. Toggle off the fill and change the stroke color to black. On the Controls Bar, set the Shape to Triangle In.
- Move the cursor to the balloon neck (joint between the body and the end). Press down the mouse left button and drag the cursor vertically down. Release the mouse button, move to the side and press down the left mouse button and drag the cursor diagonally. Release the mouse button and mouse left click a point a little further down as shown.

- Press RETURN.
Done!


Comments