Posts

Showing posts from October, 2009

Rotate the Painter canvas dynamically using the Wacom tablet

Image
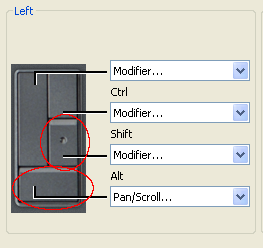
I learnt that the Corel Painter canvas can be rotated dynamically using the Wacom tablet buttons. It is actually quite simple but sometimes I forget how to do it unless I write it down somewhere (or post it on the Internet somewhere). If the Wacom tablet button properties are the default properties (as shown in the screenshot below), then to rotate the canvas, do the following: Press and hold down the two buttons highlighted in red ellipses below. Note: these two buttons correspond to the ALT + SPACE buttons on the keyboard . Drag the pen on the tablet in the direction of the desired rotation.  A screenshot of a rotated canvas is shown below. Now to rotate back to the normal landscape or portrait orientation, you can either press SHIFT+left mouse click on the canvas or press the table button below and press the pen down on the canvas.

Tracing a photograph with Painter's medium felt tip pen

Image
Tracing a photograph in Corel Painter is real easy. Just simply open up the photo, do a quick clone, and trace over it with a brush variant such as the Medium Felt Tip  Felt Pen . Start up Corel Painter . Open up a photograph such as this photo of a Merlion . Next, select File > Quick Clone . A clone of the original photo is created and a translucent tracing paper is placed over it as shown below. The brush category automatically changes to the Cloners group . Since I want to trace a thick black outline, I change the Brush Category to Felt Pens and choose the Medium Tip Felt Pens brush variant. Change the Main color to black . Now zoom in and use the tablet and pen to trace over the photo. To view the tracing paper without the original photo underneath it, press CTRL+T on the keyboard. The original photo is no longer displayed . Save the tracing using File > Save . 

Easy way to convert a color image to black and white with Painter

Image
I finally found an easy way to convert a color image to a gray scale image in Corel Painter X . Previously I used the Match Palette command (see my previous post ) to do the conversion but without looking I found a one button command to do the same job. The command is found in the Underpainting palette. Here are the steps to use the command. In Corel Painter , open up a color image file. The color image is displayed . If the Underpainting palette is not shown, select Window > Show Underpainting . The Underpainting palette is displayed . In the Photo Enhance combo box, choose Black and White as shown below. The color image is previewed as a black and white image . Click Apply . The color image is converted to a black and white image .

Float a selection in Corel Painter

Image
In order to copy or move a selection from one layer to another layer in typical Windows graphic applications, I usually perform a copy and paste operation to/from the Windows Clipboard . Corel Painter has a Float command which allows me to do the same without having to go through the Clipboard . The Float command can be used in this way: Move a selection to a new layer In Corel Painter, open up an image file. Select Window > Show Layers . The Layers palette appears . Click a selection command e.g. Rectangular Selection , Oval Selection , Lasso . Place a selection on the image. Select Select > Float . A new layer is created and the content within the selection is moved from the original layer to the new layer . Copy a selection to a new layer Alternatively, instead of moving a selection, the Float command can be used to copy the selection to a new layer. Click a selection command. Place a selection on the image. Press ALT and choose Select > Float . A n

Make computer generated pencil sketches of any images

Image
You can use Corel Painter X to make any photographs or images into artistic looking pencil sketches. Painter X has this convenient Auto Playback Strokes function which you can use to automatically place saved drawing strokes on images. In other words, this function actually draws an image for you using a brush or pencil of your choice using your preferred drawing strokes. These are the steps that I used to make the pencil sketch images. In Corel Painter X, open up a grayscale image you want to convert to a pencil sketch. Select File > Clone . The original image is cloned into a new window . Press CTRL+a . The entire cloned image is selected . Press Backspace . The cloned image is erased from the window . In the Brush Selector bar, choose the Pencils Category and a 2B Pencils variant as shown below. Click the Brush Selector's menu arrow. The Brush Selector's menus appear . In the menu, choose a saved stroke e.g. Short Stroke . The se

Desaturate a color image with Corel Painter X

Image
How do you convert a color RGB image to a grayscale image using Corel Painter? I could not find any obvious command like Photoshop's or Gimp's Grayscale Mode command. After some fiddling around, I finally figured out a way to remove the color of an RGB image file using Corel Painter X's Match Palette command. My steps are describe below. Run Corel Painter X and open up an RGB color image. The color image is displayed . In the Colors palette, use the Hue/Saturation/Value wheel to choose black as the Main Color  (front box) and white color (background box) as the Additional Color  as shown in the figure below. Note: see my previous post on how to set the Main and Additional Colors . In the Gradients palette, click the Gradient Selector button as shown below. The list of gradients appears . Choose the Two-Point gradient. The Two-Point gradient becomes the active gradient . Select File > New . The New dialog box appears . Click OK . A