Posts

Showing posts from July, 2012

Create text outlines using Inkscape's linked offset function

Image
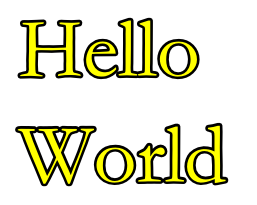
The Linked offset command in Inkscape can be used to create an outlined text string effect as shown in the ' Hello World ' figure below. The following steps illustrate how this effect can be created. Run Inkscape . Click the Create and edit text objects icon in the main tool bar or press F8 . Click on the canvas page. Do not click and drag. A blinking cursor is displayed on the page . Type in the text string e.g. Hello World . Select Path | Linked offset  in the menu bar. The text is duplicated and linked to the source text string object. Note the diamond handle at the top of the text object . Move the cursor over the diamond and click and drag out the text. Now click on the source base text. Note: the source base text would have a smaller bounding rectangle as shown below . Click on a color in the palette to change the fill color of the base text, e.g. yellow . The outlined text effect is created . The outline and base text are linked. If you edit the text, e.

Create an indented line divider in Inkscape

Image
A professional looking  3-D indented line divider can be easily created using just a simple line and a linear gradient using Inkscape . The figure below shows how the completed indented line divider looks like. The following steps outline how to create this indented line divider using Inkscape. In Inkscape , use the Pen (SHIFT+F6) or Pencil (F6) tool to draw a horizontal black line with no fill. Optional . If the Fill and Stroke pane is not displayed, select Object | Fill and Stroke in the menu bar. In the Fill and Stroke pane, click the Stroke style tab. Change the Width to 2 px.   In the Fill and Stroke pane, click the  Stroke paint  tab. Then click the Linear gradient icon. Click Edit . The Gradient editor dialog box appears . Click Add stop . Another stop is added to the linear gradient . There are now three stops . In the Gradient editor drop down combo box, choose the last stop. Change the Stop Color to CMYKA  ( 0,0,0,30,100 ) values. In the Gradient e

Create an embossed text effect using Inkscape

Image
I learnt how to use Inkscape to create a 3-D embossed effect on text objects simply by using the text object's fill blur property. An example of the effect is shown in the image below. The following steps show how the effect was created on an existing text vector drawing. In Inkscape , open up the Fill and Stroke pane by selecting Object | Fill and Stroke  in the menu bar. Press F1 . Click on the text object. The text object is selected with handles around it . Press CTRL+C . The selected text object is copied to the clipboard . Press CTRL+V twice. The text object is duplicated twice . Press F8 . Click on one of the text object. In the Fill and Stroke pane, click the Fill tab. Change the selected text object's  fill color to black . In the Fill and Stroke pane, adjust the Blur property to define the emboss effect e.g. 10 . The selected text object is blurred . Press F8 . Click on another text object. In the Fill and Stroke pane, click the Fill tab. Adju

How to copy and paste the color from one object to another using Inkscape

Image
In Inkscape , it is possible to copy the color from one object to another object using the Pick Color   tool. This saves a bit of time since you don't have to note down the source color and type in the new RGB color values in some dialog box.  To illustrate how to do this, see the following steps. In Inkscape , click the Pick Color tool    icon in the left tool bar or press F7 on the keyboard. The cursor changes to an eye dropper . Hover the cursor over the object with the source color e.g. green S , as shown below. Then press CTRL+C . The color underneath the cursor is copied over to the clipboard . Then click the Select and transform objects tool or press F1 . Now click on the object to be changed, e.g. blue G , as shown below. Press CTRL+V . The selected object's color is changed from blue to green. 

A Canal in Venice - digital pastel done in MyPaint

Image
This piece of A canal in Venice was done using the digital pastel brushes in MyPaint and overlaid with the source photo at 50% opacity.