Posts

Showing posts from 2013

Digital Dog Portrait

Image
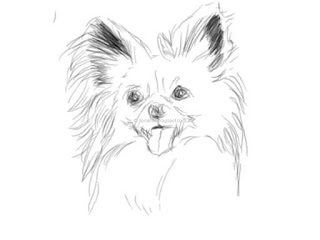
Another digital art piece done using the Android App - Serious Paint  on a tablet. This time I was trying out different brushes - pencil , soft shader , and blend, and varying the brush diameter. I used the Save function to save the work-in-progress at different stages this time, as shown below. I must say the Blend brush result looks like blending charcoal with my finger. Pencil sketch outline Beginning color shading Final piece I used a rubber tip stylus and at times my finger. Sometimes, I wish the stylus was more sensitive and it didn't drag and stick on the screen as much.

Portrait of a cat painted on a tablet using the Serious Paint Android app

Image
Here is a digital art of a cat(!) painted on an HP Touchpad running Android Jelly Bean using this nice free app - Serious Paint  and a cheap rubber tip stylus. The Serious Paint app looks similar to another Android app for painting - Infinite Painter but it is much more stable; Infinite Painter keeps crashing all the time to the point that you can't do anything worthwhile.

How to clip lines with a polygon using Inkscape

Image
In Inkscape , the Clip function can be used to clip one or more lines with a polygon. The trick is to group all the lines together before clipping as shown in the example below. In Inkscape , select all the vector lines using the Select and transform objects tool (F1) . Select Object | Group . The lines are grouped as one . Now select the polygon. Select Edit | Copy to make a copy of the polygon. Then select Edit | Paste in Place . The polygon is copied and pasted on top of the lines . Now press SHIFT and click to select the group of lines together with the polygon. The polygon and the group of lines are selected . Select Object | Clip | Set . The lines are nicely clipped to the polygon .

Use Raw Therapee to reduce noise in photo images

Image
Photos taken in low light and high iso situations may look noisy at 1:1 resolution. An example of a moderately noisy image is shown below. Raw Therapee has a good noise reduction function which can be accessed by clicking the Detail pane on the right. This will display the Sharpening , Noise reduction and Defringe settings as shown in the screenshot below. Toggle on Enabled for Noise reduction . Then gradually adjust the Luminance , Chrominance or Gamma values and observe the level of noise in the image preview until the noise is reduced to your satisfaction. Then press CTRL+S and save the image into an output TIFF, JPEG, or PNG file. 

Getting Raw Therapee to work with raw Hasselblad files (.3fr and .fff)

Image
Raw Therapee can display and work with the raw Hasselblad camera files - those with the file extensions (*.3fr and *.fff). However, they will not be visible until you change Raw Therapee's preferences to add in the  Hasselblad file extensions as shown below. Start Raw Therapee . Click the Preferences button. The Preferences dialog box appears . Click the File Browser tab. In the Add Extension field, type in 3fr . Click + . The extension 3fr is appended to the list . In the Add Extension field, type in fff . Click + . The extension fff is appended to the list . Click OK . Raw Therapee will now be able to display raw Hasselblad files .

Correct image perspective using Raw Therapee

Image
Raw Therapee has some useful tools for correcting horizontal and vertical perspectives in photo images. The perspective problem is more noticeable on photos taken using wide angle lens e.g. 24 mm or wider, as shown in the screenshots of tall buildings below. In this example, the Transform tools will be used to correct a JPEG image's vertical perspective problem. Start Raw Therapee . Use the File Browser command to locate and display the image for editing. On the right, click the Transform tab. Click Perspective . Drag the Vertical slider left or right and observe the image. Stop when the buildings are aligned vertically. The perspective is corrected . Press CTRL+S. The Save dialog box appears . Type in a file name and choose a folder and/or format. Click OK . The file is saved .

Correct an overexposed JPEG photo image with RawTherapee

Image
Although the free and open source software  Raw Therapee is designed for processing raw camera images, it is possible to use its exposure correction tools to fix problems with JPEG images. As an example, this post demonstrates how to use Raw Therapee to correct a JPEG image for overexposure. Start Raw Therapee . The Raw Therapee application window appears . Use the File Browser , Places and Recent Folders panes on the left to browse and select a folder containing the photo(s) to be edited. Double click on  the image to open it for editing. The image is displayed in the application window . Observe the histogram on the right. The red, green, blue, and white curves are bunched to the right with a large spike at the end . Note: this is an indication of over exposure clipping . Under the Exposure pane, drag the Brightness slider to the left to reduce the brightness. At the same time, observe the histogram to ensure that the curves do not get clipped to the left. The image brigh