Posts

Showing posts from March, 2013

Getting Raw Therapee to work with raw Hasselblad files (.3fr and .fff)

Image
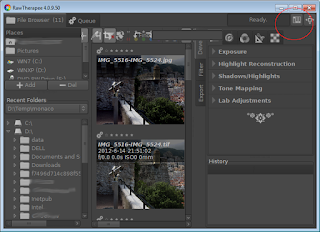
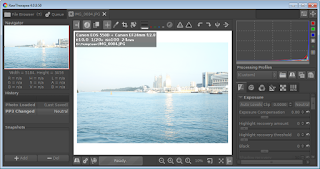
Raw Therapee can display and work with the raw Hasselblad camera files - those with the file extensions (*.3fr and *.fff). However, they will not be visible until you change Raw Therapee's preferences to add in the  Hasselblad file extensions as shown below. Start Raw Therapee . Click the Preferences button. The Preferences dialog box appears . Click the File Browser tab. In the Add Extension field, type in 3fr . Click + . The extension 3fr is appended to the list . In the Add Extension field, type in fff . Click + . The extension fff is appended to the list . Click OK . Raw Therapee will now be able to display raw Hasselblad files .

Correct image perspective using Raw Therapee

Image
Raw Therapee has some useful tools for correcting horizontal and vertical perspectives in photo images. The perspective problem is more noticeable on photos taken using wide angle lens e.g. 24 mm or wider, as shown in the screenshots of tall buildings below. In this example, the Transform tools will be used to correct a JPEG image's vertical perspective problem. Start Raw Therapee . Use the File Browser command to locate and display the image for editing. On the right, click the Transform tab. Click Perspective . Drag the Vertical slider left or right and observe the image. Stop when the buildings are aligned vertically. The perspective is corrected . Press CTRL+S. The Save dialog box appears . Type in a file name and choose a folder and/or format. Click OK . The file is saved .

Correct an overexposed JPEG photo image with RawTherapee

Image
Although the free and open source software  Raw Therapee is designed for processing raw camera images, it is possible to use its exposure correction tools to fix problems with JPEG images. As an example, this post demonstrates how to use Raw Therapee to correct a JPEG image for overexposure. Start Raw Therapee . The Raw Therapee application window appears . Use the File Browser , Places and Recent Folders panes on the left to browse and select a folder containing the photo(s) to be edited. Double click on  the image to open it for editing. The image is displayed in the application window . Observe the histogram on the right. The red, green, blue, and white curves are bunched to the right with a large spike at the end . Note: this is an indication of over exposure clipping . Under the Exposure pane, drag the Brightness slider to the left to reduce the brightness. At the same time, observe the histogram to ensure that the curves do not get clipped to the left. The image brigh