About my nocturnal adventures with Gimp, Inkscape, Corel Painter, MyPaint, Photoshop, Illustrator, Digital Graphics, Digital Painting
Digital pastel sketch of a leaf done with MyPaint
Get link
Facebook
X
Pinterest
Email
Other Apps
-
This sketch of a fall leaf was done using a pastel brush in the open source MyPaint 1.0 software. MyPaint can be downloaded from http://mypaint.intilinux.com/.
In Inkscape , it is possible to copy the color from one object to another object using the Pick Color tool. This saves a bit of time since you don't have to note down the source color and type in the new RGB color values in some dialog box. To illustrate how to do this, see the following steps. In Inkscape , click the Pick Color tool icon in the left tool bar or press F7 on the keyboard. The cursor changes to an eye dropper . Hover the cursor over the object with the source color e.g. green S , as shown below. Then press CTRL+C . The color underneath the cursor is copied over to the clipboard . Then click the Select and transform objects tool or press F1 . Now click on the object to be changed, e.g. blue G , as shown below. Press CTRL+V . The selected object's color is changed from blue to green.
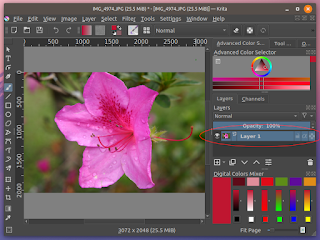
Like other image editing software such as Gimp or Photoshop , Krita has similar tools to remove the background of an image non-destructively using transparency masks. The following steps show how: Open up an image in Krita . In the Layers pane on the right, mouse right click on the paint layer. A pop up menu appears . Choose Add | Transparency Mask . A transparency mask sub layer is created underneath the paint layer . Draw a selection polygon roughly around the foreground object in the image using the Polygonal Selection Tool , as shown below. Then in the File menu, click Select | Invert Selection . Choose Black as the foreground color. Choose a Brush e.g. Basic-1 Ink . Make sure the transparency mask layer is selected or active. Then paint over the background. Choose Select | Deselect to remove the selection polygon. The marching ants selection polygon is removed . Make the brush size smaller and zoom closer to the background - foreground boundary. Brush over t...
I learnt how to use Inkscape to create a 3-D embossed effect on text objects simply by using the text object's fill blur property. An example of the effect is shown in the image below. The following steps show how the effect was created on an existing text vector drawing. In Inkscape , open up the Fill and Stroke pane by selecting Object | Fill and Stroke in the menu bar. Press F1 . Click on the text object. The text object is selected with handles around it . Press CTRL+C . The selected text object is copied to the clipboard . Press CTRL+V twice. The text object is duplicated twice . Press F8 . Click on one of the text object. In the Fill and Stroke pane, click the Fill tab. Change the selected text object's fill color to black . In the Fill and Stroke pane, adjust the Blur property to define the emboss effect e.g. 10 . The selected text object is blurred . Press F8 . Click on another text object. In the Fill and Stroke pane, click the Fill tab. Adj...


Comments