Create an embossed text effect using Inkscape
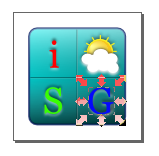
I learnt how to use Inkscape to create a 3-D embossed effect on text objects simply by using the text object's fill blur property. An example of the effect is shown in the image below.

The following steps show how the effect was created on an existing text vector drawing.

The following steps show how the effect was created on an existing text vector drawing.
- In Inkscape, open up the Fill and Stroke pane by selecting Object | Fill and Stroke in the menu bar.

- Press F1. Click on the text object.
The text object is selected with handles around it. - Press CTRL+C.
The selected text object is copied to the clipboard. - Press CTRL+V twice.
The text object is duplicated twice.
- Press F8. Click on one of the text object. In the Fill and Stroke pane, click the Fill tab. Change the selected text object's fill color to black.

- In the Fill and Stroke pane, adjust the Blur property to define the emboss effect e.g. 10.
The selected text object is blurred.
- Press F8. Click on another text object. In the Fill and Stroke pane, click the Fill tab. Adjust the Blur property to define the reverse emboss effect e.g. 10.
The selected text object is blurred.
- In the menu bar, select Object | Align and Distribute.
The Align and Distribute pane appears.
- Press F1. Click, drag and select all the three text objects.
The three text objects are selected. - In the Align and Distribute pane, click the Center on Vertical Axis and Center on Horizontal Axis icons.
The three text objects are aligned vertically and horizontally.
- Click anywhere on the drawing to deselect. Then single click on the text object.
- ALT+click on the text object to cycle through the three text objects until the black blur text object is selected.
- Use the keyboard UP arrow key to gently nudge the black blur text object up.

- ALT+click on the text object to cycle through the three text objects until the white blur text object is selected.
- Use the keyboard DOWN arrow key to gently nudge the white blur text object down.

- If the original text object is not displayed as the uppermost text objects, then ALT+click through the three text objects until it is selected. Then press HOME on the keyboard to raise the display to the top.
The embossed text effect is created.


Comments