Create text outlines using Inkscape's linked offset function
The Linked offset command in Inkscape can be used to create an outlined text string effect as shown in the 'Hello World' figure below.

The following steps illustrate how this effect can be created.
The following steps illustrate how this effect can be created.
- Run Inkscape.
- Click the Create and edit text objects icon in the main tool bar or press F8.
- Click on the canvas page. Do not click and drag.
A blinking cursor is displayed on the page. - Type in the text string e.g. Hello World.
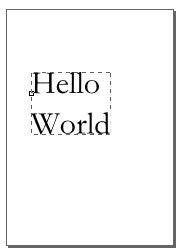
- Select Path | Linked offset in the menu bar.
The text is duplicated and linked to the source text string object. Note the diamond handle at the top of the text object.
- Move the cursor over the diamond and click and drag out the text.
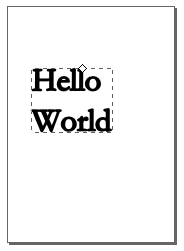
- Now click on the source base text.
Note: the source base text would have a smaller bounding rectangle as shown below.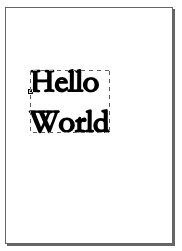
- Click on a color in the palette to change the fill color of the base text, e.g. yellow.
The outlined text effect is created.
- The outline and base text are linked. If you edit the text, e.g. append an exclamation mark, the outline effect is automatically updated to reflect the edits.


Comments