How to make an Android menu icon using Inkscape
 The Android 2.3 Gingerbread menu icons have a standard look and feel to them, according to the Android Menu Icons Design Guide at http://developer.android.com/guide/practices/ui_guidelines/icon_design_menu.html. It is possible to use Inkscape to create menu icons for Android as illustrated in the steps below.
Create and setup the document
- Run Inkscape. Select File | Document Properties.
The Document Properties dialog box appears.
- In the Width and Height fields, type in the largest menu icon hdpi size e.g. 72 pixels. Close the dialog box.

- Use the Create Rectangles and Squares (F4) command and place a square on the page to serve as the recommended bounding box 48x48 pixels for the icon.
- Select the rectangle. Change the Width and Height to 48 pixels.
- Select Object | Align and Distribute.
The Align and Distribute pane appears. - Set the Align Relative to Page. Click on the Center to Vertical Axis and Center to Horizontal Axis buttons.

- Select Layer | Layers.
The Layers pane appear. - Rename the layer to Guide 48x48.

Construct the icon
- In the Layers pane, add a new layer above the Guide layer and name it as Star.

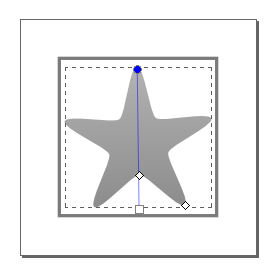
- Click the Create Stars and Polygon (*) command. Place a star on the page.

- Select the star. If necessary, change the fill to black and remove the stroke.
- In the Align and Distribute pane, click the Center to Vertical Axis and Center to Horizontal Axis buttons to align the star to the center of the page.

- Select Object | Fill and Stroke.
The Fill and Stroke pane appears.
- Click the Fill tab. Change the type to Linear Gradient. Click the Edit button.
The Gradient editor dialog box appears.
- For the first stop, type in 8c8c8cff in the RGBA field.
- Select the second stop in the combo box. Type in b2b2b2ff in the RGBA field. Close the Gradient editor.

- Now click the Edit Paths by Nodes (F2) command. Click on the star.
- Move the gradient handles so that the dark stop is at the bottom and the lighter stop is at the top.

- In the Layers pane, make a duplicate of the star layer below the Star layer. Lock the duplicate layer. Turn off the Guide layer.
Create the shadow and highlight effects
- In the Layers pane, click the Star layer to make it active.

- Click the Create Rectangles and Squares (F2) command. Place a rectangle which covers an area larger than the page.

- Select the star and the rectangle together.
- Select Path | Exclusion.
An inverse of the icon is created.
- Select the inverse icon and change the fill to black and the stroke to white.

- In the Fill and Stroke pane, click the Fill tab. Change the Blur to 4.0. Change the Opacity to 50.

- Use the arrows in the X and Y fields to nudge the shadow a few times to the right and bottom.

- Now select the copy of the star icon. Press CTRL+C to copy it to the clipboard.
- In the Layers pane, select the Star layer which contains the shadow and highlight effects to make it active.

- Select the star and the shadow and highlight effects.
- Select Object | Group.
The icon and the effects are grouped together. - Select Edit | Paste in Place.
A copy of the star icon is placed on top of the group.
- Select the star and the group.

- Select Object | Clip | Set.
The menu icon is created.
Export as PNG


Comments